A dresser is a great piece of furniture to update with a little paint and some new hardware. You can give it a whole new look for just a few dollars! We have curated here a wide array of dresser makeover ideas to get you started. Regardless of the size or shape of the dresser you want to revamp, find your most suitable option and get to work crafting that amazing new look! We have tried to systematically provide you with before/after pictures. Also, make sure to check the links: most case studies are providing step-by-step directions and the materials used to reproduce the exact look.
Here are the 40 best dresser makeover ideas for a gorgeous new look:
Table of Contents
1. Painted dresser ideas
The most common option for a great makeover! You can give your old plain wood dresser a completely new look by painting it a different color or repainting a colored dresser using a different painting technique or color.
This white refinish did not need any sanding. It definitely uses more paint (she used 4 coats!), but saves a ton of effort. Source www.frillsanddrill.com (step by step)
1.2 Washed color
Give your dresser a unique look by painting it with a wash. A wash is a paint layer thin enough to let the underlying material appear. The paint is usually diluted with water or an equal amount of paint thinner. You can use almost any color you want, but light colors are best because they show the texture of the wood more clearly.
Really, really cool look for this washed blue. The new copper-colored handle match very well with the new paint job. Source girlinthegarage.net (step by step)
1.3 Going with stripes
Distressed paint + vertical stripes for an amazing shabby chic look. What’s not to like in this stunning French dresser makeover? Source wallsofwonderland.com (step by step)
Another great idea for stripes. The transparent handles are a great idea to avoid disruption in the striped pattern. Source: sophiasdecor
Another shabby chic striped look for this tall dresser. Keeping the original handles + the asymmetrical pattern make an awesome result! Source: Leisure Living Furniture
1.4 Dresser makeover using color gradients
This can be achieved by using two or more colors of paint and painting each panel a different color. Begin by painting the top of the dresser a light color and then work your way down, adding a darker color as you go. You can use any colors you like, but it’s best to choose colors that will coordinate with the rest of your bedroom decor. On top of the examples below, check out also the gradient refinish examples in the plain wood category
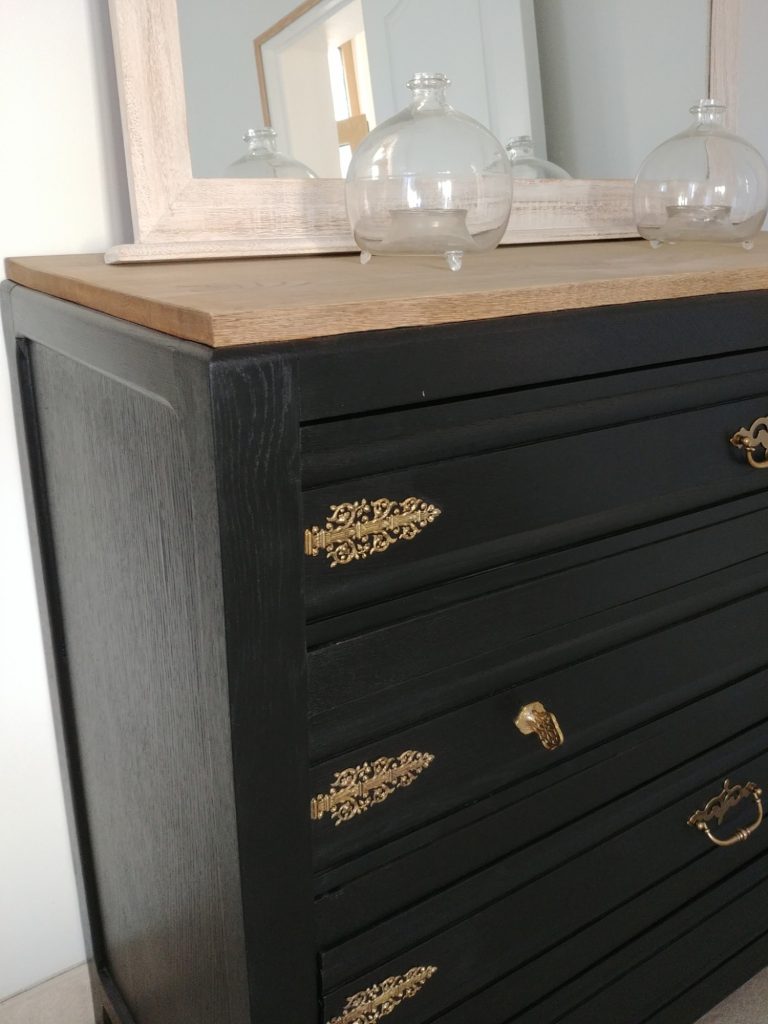
This is by far one of the most popular makeovers, and we’re guilty of using the technique extensively. Most often the two-tone means leaving the drawers plain wood, and painting the dresser body with a dark color (we even have a dedicated Pinterest board!). But the two-tone can be also using any contrasting color scheme between the the drawers & the body.
Black and wood is one of the most stunning combinations, especially if the dresser’s wood is light-colored (such as softwood). Check out this amazing work from Christina: two-toned black & wood dresser makeover (step by step)
Another example: if the wood is naturally darker or you want to keep a dark stain, a lighter paint will contrast better. Here Christina had to remove the veneer and the greenish wood called for a dark stain. Check this two tone green and wood dresser makeover (step by step).
Sometimes a dresser makeover does not need any paint at all: a refinish will just look as gorgeous!
Check how this refinish gave a completely new shine to this antique dresser. Source: refreshliving.us
Incredible look from a gradient of stain colors. It should also belong to the gradient category, but we didn’t want to post it two times ????. Source: funcycled.com (step by step)
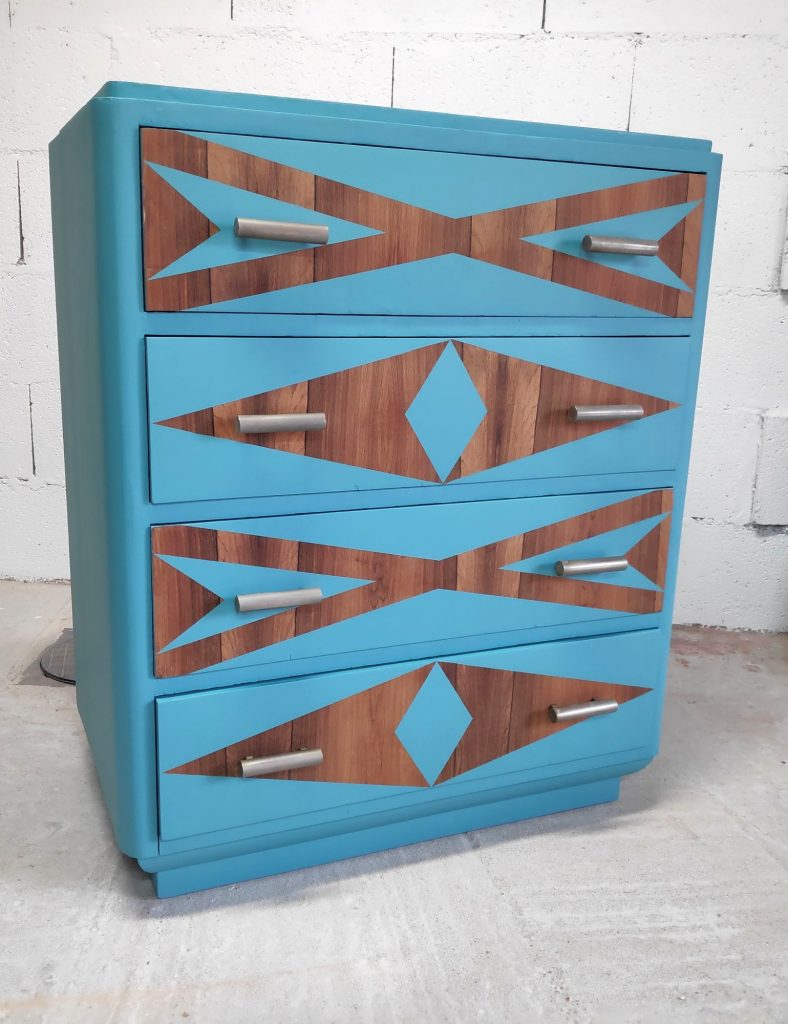
3. Refinish using stencils & image transfers
This is the perfect technique to add anything from a geometric pattern to a floral design. Tip: use transparent handles!
If you don’t know Kacha’s Furniture makeovers, you HAVE to check out her youtube channel (detailed step by steps) or her Tiktok. Every item she puts her hands on is literally turned into a piece of art. The above example, using image transfers to create this floral pattern, is no exception.
With an excellent combination of stripes and image transfer, this dresser is barely recognizable. Source: girlinthegarage.net (step by step)
4. Using wallpaper
A very common makeover is to apply wallpaper to the drawer interiors. Covering the dresser exterior with wallpaper is a little less popular, but you can achieve really stunning results while needing less surface preparation. Stripping the previous finishing or paint is unnecessary, as long as you sand it enough for the glue to adhere. You can use blank whitepaper and then paint it to add a touch feeling texture while having unlimited color options. Or just go for a pattern that matches your room!
Erin from DIY Passion chose to apply an uncolored wallpaper and then paint it. A really cool idea to add texture to your drawers or your dresser body. Source: diypassion.com (step by step)
As an alternative to wallpaper, you can use fabric. It’s a little more difficult to apply than whitepaper as it doesn’t have as much rigidity, and fabric may be more fragile than coated wallpaper. But it allows repurposing any old, good-looking piece of fabric. Check out this awesome example from littleredwindow.com (step by step)
5. Changing knobs & handles to give your dresser a style upgrade
As you can see in these examples, changing the handles & knobs can go a long way to give your dresser a whole new look. There is a huge range of knobs and handles available online or in stores, so you can find something that matches your existing decor & the colors & patterns you chose for the makeover. You may also want to consider whether you want to match the hardware to the other furniture in the room or go for something completely different.
As mentioned earlier, glass (transparent) handles are perfect for stencil or image transfer makeovers. Check out this example from our accent cabinet makeover
Did you know you can paint knobs? Pumpkin knobs were added to this light blue dresser. They were originally bronze, so Christina painted them white instead.
Christina also chose card catalog handles to give a dresser a bit of a workshop look.
6. Adding decorative trims, appliques, overlays, or moldings
Making your IKEA dresser look unique is so in demand that there are entire websites dedicated to IKEA hacks, and e-commerce have emerged just to sell you the hardware. Above is a perfect example of how a boring Swedish design can become gorgeous with a bit of elbow grease. Source ikeahackers.net
Adding wood appliques or trims is a great way to make your dresser a more upscale look.
Find out how to transform an old pine dresser to give it a timeless and elegant look in just under 48 hours. We all have a solid pine chest of drawers or cabinet in our homes. If you don’t have any in stock at home, you may have stumbled upon one of these treasures at […]
With its tapered legs and solid oak wood drawers, this dresser’s design is truly timeless with a minimalist feel. Despite its relatively small size, this handsome chest of drawer provides roomy space for clothes and accessories. For a modern twist Amelie partially painted it with a bright white paint. The exposed wood is in great condition and
This chest of drawers is perfect for any space but it has seen better days. The top and second drawer were marked by years of hard use. However, it is made of solid wood with beautiful oak veneer. Its solid construction ensures a long-lasting piece of furniture. It has been updated with a modern twist,
That is the story of an old and outdated dresser that has been sitting in your garage for decades. This dresser is a typical piece of furniture from the 1960’s or 1970’s, made of solid beech wood and plywood. The design is still modern but the dark honey old finish(Yuck!) was really outdated. Despite having
Are you looking for a unique way to spruce up an old dresser? Look no further! Today, I’m going to show you how to give your vintage dresser a modern makeover using blue paint and painter’s tape. This easy DIY project is sure to add tons of personality and style to any vintage piece of
Transforming an outdated and boring dresser into a beautiful statement piece is easier than you may think. With the right supplies and a little bit of creativity, you can give your tapered legs vintage dresser an eye-catching makeover that will be the envy of your friends and family. Follow our step-buy-step tutorial! Today’s makeover candidate
This is the story of a dark brown massive dresser. The piece was really big, without particular charm but it was sturdy and in good shape. This dresser was a perfect candidate for a makeover. This makeover was carried out by Chrystele. She needed a dresser for her bedroom and saw the potential of this
See how I upcycled this mini dresser using homemade mustard yellow chalk paint and wood stain. This makeover is a perfect project for beginners. I found this small chest of drawers on the Facebook Marketplace. The seller was located in the neighboring village and the selling price was cheap (€ 10 )! I immediately decided
How to update an old and damaged vintage dresser using paint and stain As you know from previous blog posts, not too long ago I was able to score a truckload of free furniture off the Facebook Marketplace. It included a sideboard cabinet without drawers which the Hubs and I repurposed into a kitchen island.
Give an outdated chest of drawers a new look with the two-tone technique using chalk paint and stain! Hello all! I am super excited to share with you our project this week. We are in the process of giving our master bedroom a makeover. Nothing major because we rent. With that being said, we will


 Stunning plain color update. Note the much more modern look from the new handles.
 Stunning light purple makeover. The top got a new stain that is adding contrast to the color. Source
  Another really nice light blue update. Note the updated handles as well. Source
 Really, really cool look for this washed blue. The new copper-colored handle match very well with the new paint job. Source
  Distressed paint + vertical stripes for an amazing shabby chic look. What’s not to like in this stunning French dresser makeover? Source
  Another great idea for stripes. The transparent handles are a great idea to avoid disruption in the striped pattern. Source:
  Another shabby chic striped look for this tall dresser. Keeping the original handles + the asymmetrical pattern make an awesome result! Source:
  The original boring black got an incredible upgrade with this pink-colored ombre gradient. Source
  This boring IKEA dresser was begging for a colorful upgrade. Really nice “IKEA hack” from


 Another really nice contrasting upgrade for this painted nautical dresser. Source:
  But less contrast can also look really good: here is an example of a really gorgeous dark over dark two-tone. Source
  Another example of dark-over-dark, keeping only the top drawers raw colored. Source
 Check how this refinish gave a completely new shine to this antique dresser. Source:
  Incredible look from a gradient of stain colors. It should also belong to the gradient category, but we didn’t want to post it two times ????. Source: